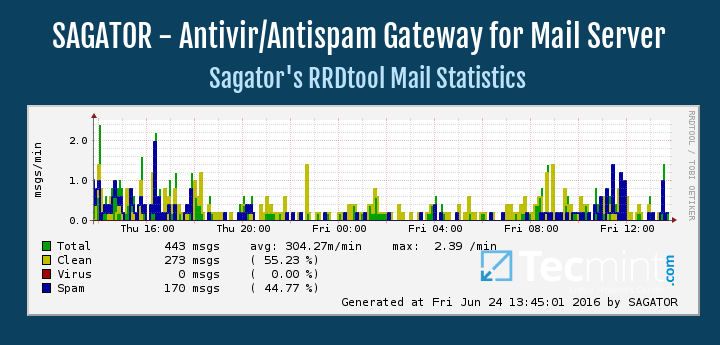
We read of virus infections (new ones come out all the time) and are somehow affected by spam mail on a daily basis. While there are plenty of free and commercial solutions (available as client applications) for both nuisances, system administrators need to have a strategy for dealing with these threats well before they reach the users’ mailboxes.
Wednesday, May 31, 2017
How to Install and Configure RoundCube Webmail Client with Virtual Users in Postfix – Part 4
In Parts 1 through 3 of this Postfix series we explained, step by step, how to set up and configure an email server with virtual users. We also showed you how to access one of those accounts using Thunderbird as email client.
In this era of connectivity when you are likely to need access to your inbox from anywhere (and not just from your home computer), server-side software known as webmail clients make it possible for you to read and send emails through a web interface.
How to Add Antivirus and Spam Protection to Postfix Mail Server with ClamAV and SpamAssassin – Part 3
In the previous two articles of this Postfix series you learned how to set up and manage the email server database through phpMyAdmin, and how to configure Postfix and Dovecot to handle incoming and outgoing mail. In addition, we explained how to set up a mail client, such as Thunderbird, for the virtual accounts we created previously.
Since no email server setup can be complete without taking precautions against viruses and spam, we are going to cover that topic in the current article.
How to Configure Postfix and Dovecot with Virtual Domain Users in Linux – Part 2
In the previous article of this series we explained how to set up and manage the mail server database securely using phpMyAdmin.
Requirement:
How to Setup Postfix Mail Server and Dovecot with Database (MariaDB) Securely – Part 1
In this 3-article series we will discuss how to set up a Postfix mail server with antivirus and spam protection in a CentOS 7 box. Please note these instructions also works on other distributions such as RHEL/Fedora and Debian/Ubuntu.
Our plan consists in storing email accounts and aliases in a MariaDB database which is for our convenience, will be managed through phpMyAdmin.
If you choose to not install phpMyAdmin, or are dealing with a CLI-only server, we will also provide the equivalent code to create the database tables that will be used throughout this series.
Since keeping a mail server up and running is one of the essentials tasks that are usually assigned to system administrators and engineers, we will also provide a few tips to efficiently run this critical service in a production environment.
Centralized Secure Storage (iSCSI) – “Initiator Client” Setup on RHEL/CentOS/Fedora – Part 3
iSCSI Initiator are the clients which use to authenticated with iSCSI target servers to access the LUNs shared from target server. We can deploy any kind of Operating systems in those locally mounted Disks, just a single package need to be install to get authenticate with target server.
How to Create and Setup LUNs using LVM in “iSCSI Target Server” on RHEL/CentOS/Fedora – Part 2
LUN is a Logical Unit Number, which shared from the iSCSI Storage Server. The Physical drive of iSCSI target server shares its drive to initiator over TCP/IP network. A Collection of drives called LUNs to form a large storage as SAN (Storage Area Network). In real environment LUNs are defined in LVM, if so it can be expandable as per space requirements.
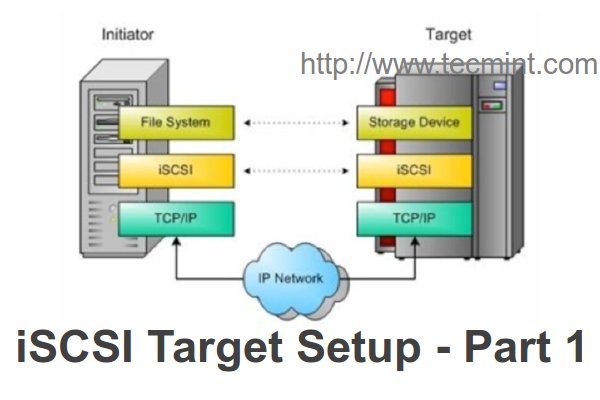
Create Centralized Secure Storage using iSCSI Target on RHEL/CentOS/Fedora Part 1
iSCSI is a block level Protocol for sharing RAW Storage Devices over TCP/IP Networks, Sharing and accessing Storage over iSCSI, can be used with existing IP and Ethernet networks such as NICs, Switched, Routers etc. iSCSI target is a remote hard disk presented from an remote iSCSI server (or) target.
Labels:
linux
Location:
Houston Metropolitan Area, TX, Hoa Kỳ
How to Manage RedHat Enterprise Virtualization (RHEV) Virtual Machines Operations and Tasks – Part 6
In this part of our tutorial we are going to discuss the operations and tasks such as Taking Snaphots, Creating Pools, Making Templates and Cloning are the main operations which could be performed on RHEV virtual machines hosted by RHEV environment.
Before going further, I request you to read the rest of the articles from this RHEV series here:
RHEV Clustering and RHEL Hypervisors Installation – Part 5
In this part we are going to discuss some important points related to our RHEV series. In Part-2 of this series, we’ve discussed RHEV Hypervisor deployments and installations. In this part we will discuss another ways to install RHEV Hypervisor.
How to Deploy Virtual Machines in RHEV Environment – Part 4
Our environment consist of one datacenter attached with ISCSI shared storage. This datacenter included one cluster with two hosts/nodes which will be used to host our virtual machine.
How to Deploy Data-Centers with Cluster and Add ISCSI Storage in RHEV Environment
In this part, we are going to discuss how to deploy data-center with one cluster which contains our two hosts in the RHEV environment. Both of two hosts connected to shared storage, additional to previous preparation, we will add another CentOS6.6 virtual machine acts as storage node.
How to Deploy RedHat Enterprise Virtualization Hypervisor (RHEV-H) – Part 2
In this second part, we are discussing the deployment of RHEVH or the Hypervisor nodes of our environment with some tips and tricks for your virtual lab or virtual environment.
How to Install RedHat Enterprise Virtualization (RHEV) 3.5 – Part 1
In this series we are discussing RHEV3.5 administration topics. RHEV is the RedHat Enterprise Virtualization solution, which is based on oVirt project [open-source Virtualization project].
Red Hat Enterprise Virtualization is a complete virtualization management solution for virtualized servers and desktops.
This series will discuss (How to) administration topics including the RHCVA exam objectives.
In our first article, we are discussing RHEV environment and basic deployment. RHEV consists of two main components, like Hypervisor and Management system.
RHEV-H is the Hypervisor of RHEV platform, it is a bare-metal hypervisor which used to host virtual machines. It’s also based on KVM and RHEL.
RHEVM is the management system of the environment which controls the environment hypervisors. It’s also used to create, migrate, modify and control virtual machines hosted by hypervisrors and a lot of other many tasks will be discussed later.
How to Sync Cluster Configuration and Verify Failover Setup in Nodes – Part 4
Hello folks. First of all, my apologies for the delay of the last part of this cluster series. Let’s get on to work without getting any more delayed.
As we many of you have completed all three previous parts, I will brief you what we have completed so far. Now we already have enough knowledge to install and configure cluster packages for two nodes and enable fencing and failover in a clustered environment.
Fencing and Adding a Failover to Clustering – Part 3
In the previous two guides, we’ve discussed how to install cluster, creating a cluster and adding nodes to the cluster, also we’ve studied how cluster.conf appears to be after the necessary configurations are done.
Today, in this third part of clustering series, we are going to discuss about what is fencing, failover and how to configure them in our setup.
How to Install and Configure Cluster with Two Nodes in Linux – Part 2
Hi all. Before we start the second part, let’s review about what we have done in Part 01. In Part 01 of this clustering series, we’ve discussed about clustering technique and in which cases it can be used along with the advantages and disadvantages of clustering. And also we have covered the pre-requisites for this setup and what each package will do after we configured the kind of a setup.
Introduction and Advantages/Disadvantages of Clustering in Linux – Part 1
Hi all, this time I decided to share my knowledge about Linux clustering with you as a series of guides titled “Linux Clustering For a Failover Scenario“.
First of all, you will need to know what clustering is, how it is used in industry and what kind of advantages and drawbacks it has etc.
How to Manage Software RAID’s in Linux with ‘Mdadm’ Tool – Part 9
Regardless of your previous experience with RAID arrays, and whether you followed all of the tutorials in this RAID series or not, managing software RAIDs in Linux is not a very complicated task once you have become acquainted with
mdadm --manage command.
In this tutorial we will review the functionality provided by this tool so that you can have it handy when you need it.
How to Recover Data and Rebuild Failed Software RAID’s – Part 8
In the previous articles of this RAID series you went from zero to RAID hero. We reviewed several software RAID configurations and explained the essentials of each one, along with the reasons why you would lean towards one or the other depending on your specific scenario.
Growing an Existing RAID Array and Removing Failed Disks in Raid – Part 7
Every newbies will get confuse of the word array. Array is just a collection of disks. In other words, we can call array as a set or group. Just like a set of eggs containing 6 numbers. Likewise RAID Array contains number of disks, it may be 2, 4, 6, 8, 12, 16 etc. Hope now you know what Array is.
Here we will see how to grow (extend) an existing array or raid group. For example, if we are using 2 disks in an array to form a raid 1 set, and in some situation if we need more space in that group, we can extend the size of an array using mdadm –grow command, just by adding one of the disk to the existing array. After growing (adding disk to an existing array), we will see how to remove one of the failed disk from array.
Setting Up RAID 10 or 1+0 (Nested) in Linux – Part 6
RAID 10 is a combine of RAID 0 and RAID 1 to form a RAID 10. To setup Raid 10, we need at least 4 number of disks. In our earlier articles, we’ve seen how to setup a RAID 0 and RAID 1 with minimum 2 number of disks.
Here we will use both RAID 0 and RAID 1 to perform a Raid 10 setup with minimum of 4 drives. Assume, that we’ve some data saved to logical volume, which is created with RAID 10. Just for an example, if we are saving a data “apple” this will be saved under all 4 disk by this following method.
Tuesday, May 30, 2017
Setup RAID Level 6 (Striping with Double Distributed Parity) in Linux – Part 5
RAID 6 is upgraded version of RAID 5, where it has two distributed parity which provides fault tolerance even after two drives fails. Mission critical system still operational incase of two concurrent disks failures. It’s alike RAID 5, but provides more robust, because it uses one more disk for parity.
In our earlier article, we’ve seen distributed parity in RAID 5, but in this article we will going to see RAID 6 with double distributed parity. Don’t expect extra performance than any other RAID, if so we have to install a dedicated RAID Controller too. Here in RAID 6 even if we loose our 2 disks we can get the data back by replacing a spare drive and build it from parity.
Creating RAID 5 (Striping with Distributed Parity) in Linux – Part 4
In RAID 5, data strips across multiple drives with distributed parity. The striping with distributed parity means it will split the parity information and stripe data over the multiple disks, which will have good data redundancy.
For RAID Level it should have at least three hard drives or more. RAID 5 are being used in the large scale production environment where it’s cost effective and provide performance as well as redundancy.
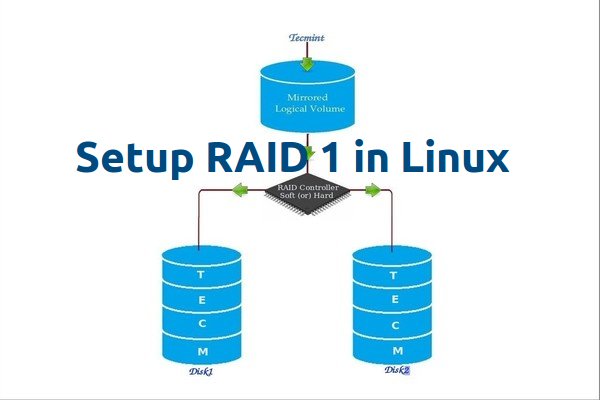
Setting up RAID 1 (Mirroring) using ‘Two Disks’ in Linux – Part 3
RAID Mirroring means an exact clone (or mirror) of the same data writing to two drives. A minimum two number of disks are more required in an array to create RAID1 and it’s useful only, when read performance or reliability is more precise than the data storage capacity.
Mirrors are created to protect against data loss due to disk failure. Each disk in a mirror involves an exact copy of the data. When one disk fails, the same data can be retrieved from other functioning disk. However, the failed drive can be replaced from the running computer without any user interruption.
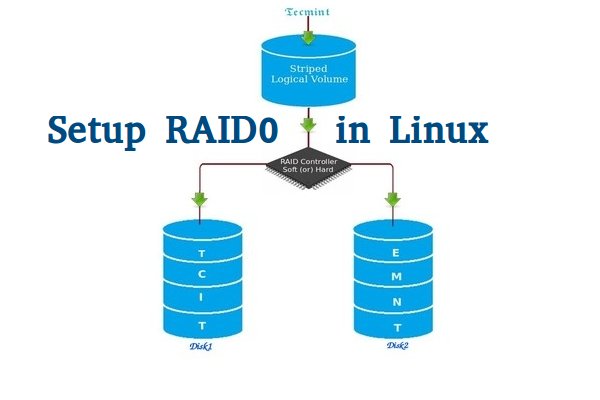
Creating Software RAID0 (Stripe) on ‘Two Devices’ Using ‘mdadm’ Tool in Linux – Part 2
RAID is Redundant Array of Inexpensive disks, used for high availability and reliability in large scale environments, where data need to be protected than normal use. Raid is just a collection of disks in a pool to become a logical volume and contains an array. A combine drivers makes an array or called as set of (group).
RAID can be created, if there are minimum 2 number of disk connected to a raid controller and make a logical volume or more drives can be added in an array according to defined RAID Levels. Software Raid are available without using Physical hardware those are called as software raid. Software Raid will be named as Poor man raid.
Introduction to RAID, Concepts of RAID and RAID Levels – Part 1
RAID is a Redundant Array of Inexpensive disks, but nowadays it is called Redundant Array of Independent drives. Earlier it is used to be very costly to buy even a smaller size of disk, but nowadays we can buy a large size of disk with the same amount like before. Raid is just a collection of disks in a pool to become a logical volume.
How to Manage KVM Virtual Environment using Commandline Tools in Linux
In this 4th part of our KVM series, we are discussing KVM environment management using CLI. We use ‘virt-install’ CL tool to create and configure virtual machines, virsh CL tool to create and configure storage pools and qemu-img CL tool to create and manage disk images.
How to Manage KVM Storage Volumes and Pools for Virtual Machines – Part 3
In this part 3 of our tutorial, we are discussing how to create and manage KVM Storage volumes and Pools using virt-manager GUI tool.
In general, we use storage devices with different file systems everyday. We have also some storage technologies/techniques like ISCSI, SAN, NAS and so on.
There is no huge different in the basic concepts for our virtual environment, we just use the basic concept to deploy awesome and scale-able virtual storage platform.
With KVM environment , you can use block devices or files as local storage devices within guest operating systems.
We use the physical storage devices to create virtual machine’s volumes. We could describe volumes as a virtual machine’s virtual disk. Volumes cloud be block devices or files as we have mentioned previously.
How to Deploy Multiple Virtual Machines using Network Install (HTTP, FTP and NFS) under KVM Environment – Part 2
This is the Part 2 of KVM series, here we will discuss how to deploy Linux virtual machines using network installation under KVM environment. We will discuss three types of network installation (FTP, NFS and HTTP), each one of them has its special prerequisites.
How to Create Virtual Machines in Linux Using KVM (Kernel-based Virtual Machine) – Part 1
This tutorial discusses KVM introduction, deployment and how to use it to create virtual machines under RedHat based-distributions such as RHEL/CentOS7 and Fedora 21.
What is KVM?
KVM or (Kernel-based Virtual Machine) is a full virtualization solution for Linux on Intel 64 and AMD 64 hardware that is included in the mainline Linux kernel since 2.6.20 and is stable and fast for most workloads.
Migrating LVM Partitions to New Logical Volume (Drive) – Part 6
This is the 6th part of our ongoing Logical Volume Management series, in this article we will show you how to migrate existing logical volumes to other new drive without any downtime. Before moving further, I would like to explain you about LVM Migration and its features.
Manage Multiple Logical Volume Management Disks using Striping I/O - Part 5
In this article, we are going to see how the logical volumes writes the data to disk by striping I/O. Logical Volume management has one of the cool feature which can write data over multiple disk by striping the I/O.
Setup Thin Provisioning Volumes in Logical Volume Management (LVM) – Part 4
Logical Volume management has great features such as snapshots and Thin Provisioning. Previously in (Part – III) we have seen how to snapshot the logical volume. Here in this article, we will going to see how to setup thin Provisioning volumes in LVM.
How to Take ‘Snapshot of Logical Volume and Restore’ in LVM – Part 3
LVM Snapshots are space efficient pointing time copies of lvm volumes. It works only with lvm and consume the space only when changes are made to the source logical volume to snapshot volume. If source volume has a huge changes made to sum of 1GB the same changes will be made to the snapshot volume. Its best to always have a small size of changes for space efficient. Incase the snapshot runs out of storage, we can use lvextend to grow. And if we need to shrink the snapshot we can use lvreduce.
How to Extend/Reduce LVM’s (Logical Volume Management) in Linux – Part 2
Previously we have seen how to create a flexible disk storage using LVM. Here, we are going to see how to extend volume group, extend and reduce a logical volume. Here we can reduce or extend the partitions in Logical volume management (LVM) also called as flexible volume file-system.
Setup Flexible Disk Storage with Logical Volume Management (LVM) in Linux – Part 1
Logical Volume Management (LVM) makes it easier to manage disk space. If a file system needs more space, it can be added to its logical volumes from the free spaces in its volume group and the file system can be re-sized as we wish. If a disk starts to fail, replacement disk can be registered as a physical volume with the volume group and the logical volumes extents can be migrated to the new disk without data loss.
Monday, May 29, 2017
Change the Domain Administrator Password on Windows Server 2012 R2
Model Solutions
Change the Domain Administrator
Password on Windows Server 2012 R2
1.
Boot from the Micrsoft
Windows Server 2012 R2 DVD.
2.
On the Choose an option,
select Troubleshoot.
Subscribe to:
Posts (Atom)
